
2Printer can print all files listed in a text file. It can be very convenient if you have the same documents for repeated printing. Or you already have paths to files that are stored in different locations. If you don't have a list yet, it's easy to create it. Once you have the list with file paths, specify it as a source (-src) and execute the 2Printer command to start batch printing.
If you already have a list of files
Using a TXT file as a list
If you have file paths listed in TXT format (learn how to create such a TXT file below), use this command line as an example:
2Printer.exe -src "@C:\List\docs.txt" -prn "iR C3025"
Input "Your printer name" instead of "iR C3025". Follow this tutorial if you don't know the exact name of your printer.
 Use the @ symbol at the beginning of the path to indicate that it is a list. Otherwise, 2Printer will try to print the list file itself.
Using an Excel file (XLS, XLSX, CSV) as a list
Alternatively, you can have an Excel (XLS, XLSX, CSV) file to be used as a list. This gives you more options to adjust printing parameters, such as the number of copies, color/grayscale mode, and more.
This requires a basic spreadsheet with file paths. The header of the first column should be labeled as #file. Add full file paths to this column and make sure the paths are valid.
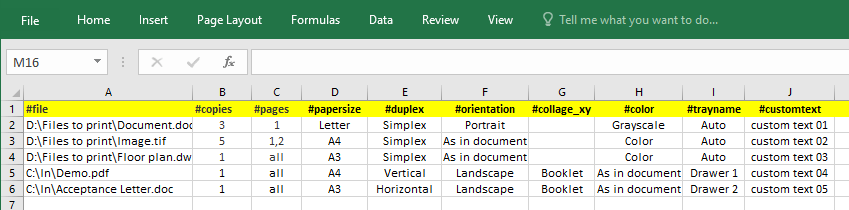
Adding optional print parameters for each file
You can customize the print settings for individual files by adding the following column headings to your Excel spreadsheet used as a list file:
- #file – Defines the file path of the document to be printed (Required).
- #copies – Sets the number of copies to print (e.g.,
3). - #pages – Specifies the page range to print (e.g.,
1,3,10-25orall). - #papersize – Sets the paper format (e.g.,
LetterorA4). - #duplex – Sets the duplex mode. Options:
Horizontal(long-edge binding),Vertical(short-edge binding),As in printer, orSimplex. - #orientation – Sets the page orientation. Options:
Portrait,Landscape,As in document, orAs in printer. - #hor_align, #ver_align – Sets the horizontal and/or vertical alignment. Options:
Left,Center,Right/Top,Center,Bottom. - #scale_mode – Defines page scaling. Options:
Shrink,Fit,Fill,As is,Booklet, orZoom level. - #zoom_percent – Sets the zoom percentage when
#scale_modeis set toZoom level(e.g.,120%). - #collage_xy – Defines multi-page grid layouts and booklet binding modes, similar to Multiple pages per sheet mode. Use the format
XxYfor grid layouts (e.g.,2x2,1x2). For booklets, useBooklet_top(vertical top binding),Booklet_left(standard horizontal binding), orBooklet_right. - #collage_frame – Set to
YesorNoto draw a black border around each page inside a grid layout. Must be used alongside#collage_xy. - #color – Sets the color output. Options:
Color,Grayscale,As in printer, orAs in document. - #trayname – Selects a specific printer tray.
- #customtext – Assigns user-specified text for custom sorting or advanced watermarking. Note: If multiple columns are needed, format them as
#customtext(1),#customtext(2), etc. - #insert_blank_pages – Inserts a blank page before specific pages (e.g.,
1,3,5), at set intervals like{every(1)}, or forodd/even pages. Tip: Using{every(1)}can emulate Simplex printing when the primary printer driver is locked to Duplex. - #prn_profile – Sets the full file path to a previously saved printer profile (
.pcprn-profile) to apply specific print settings.
Note: Any unnecessary columns (except for #file) can be completely deleted from the spreadsheet. If an option does not apply to a specific file in your list, simply leave that cell blank. 2Printer will automatically fall back to its default settings or the global parameters specified in your command-line arguments for those omitted values.
Example command:
2Printer.exe -src "@C:\List\docs.xlsx" -prn "iR C3025"
If you don't have a list of files yet
If you don't have a list of the paths yet, follow the steps below.
How to create a list with file paths
1. Locate all files in one folder
Choose a folder where files are located or collect the needed files in one folder, for example, at C:\Files to print. The number of documents that can be listed is unlimited.
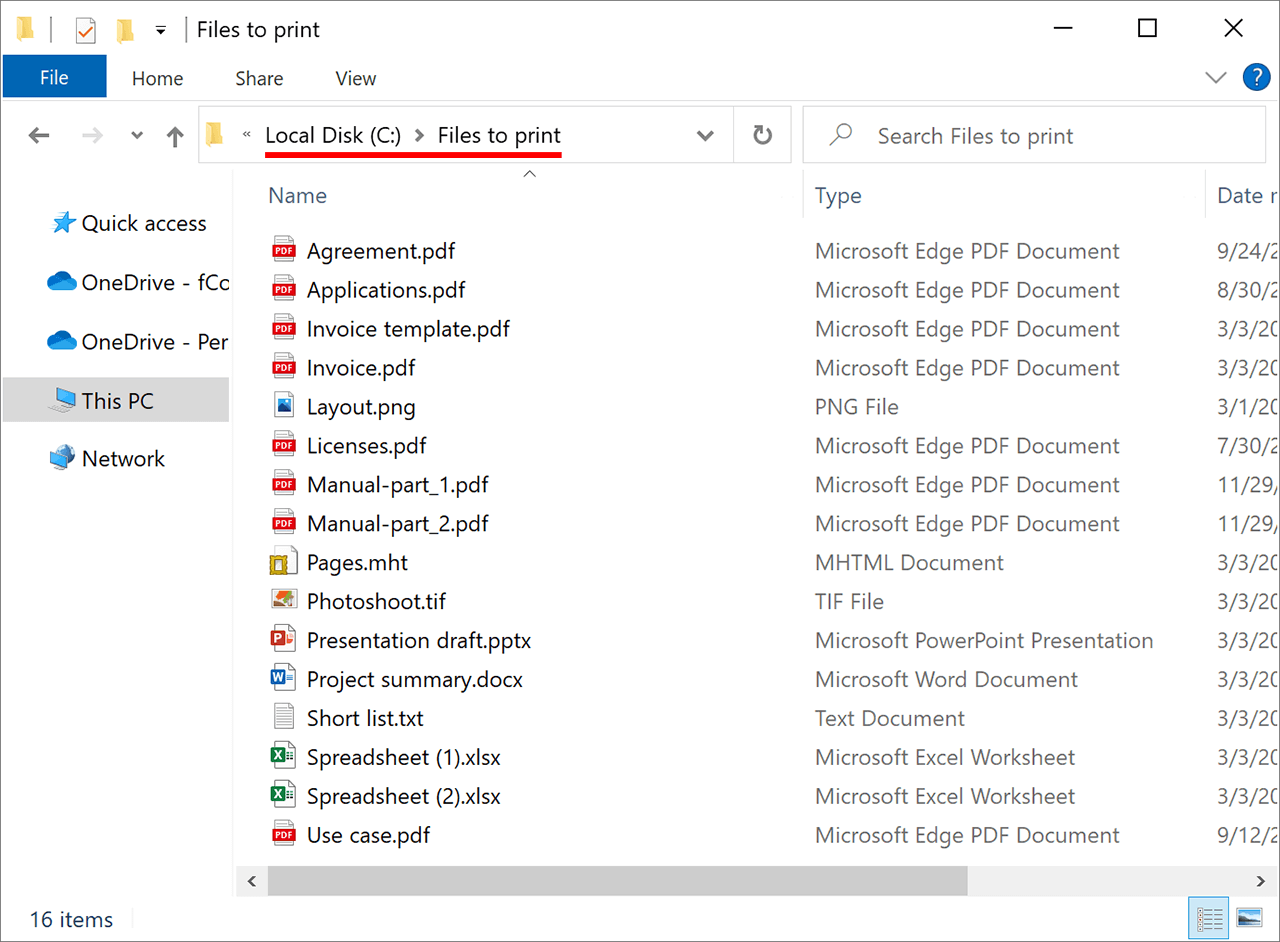
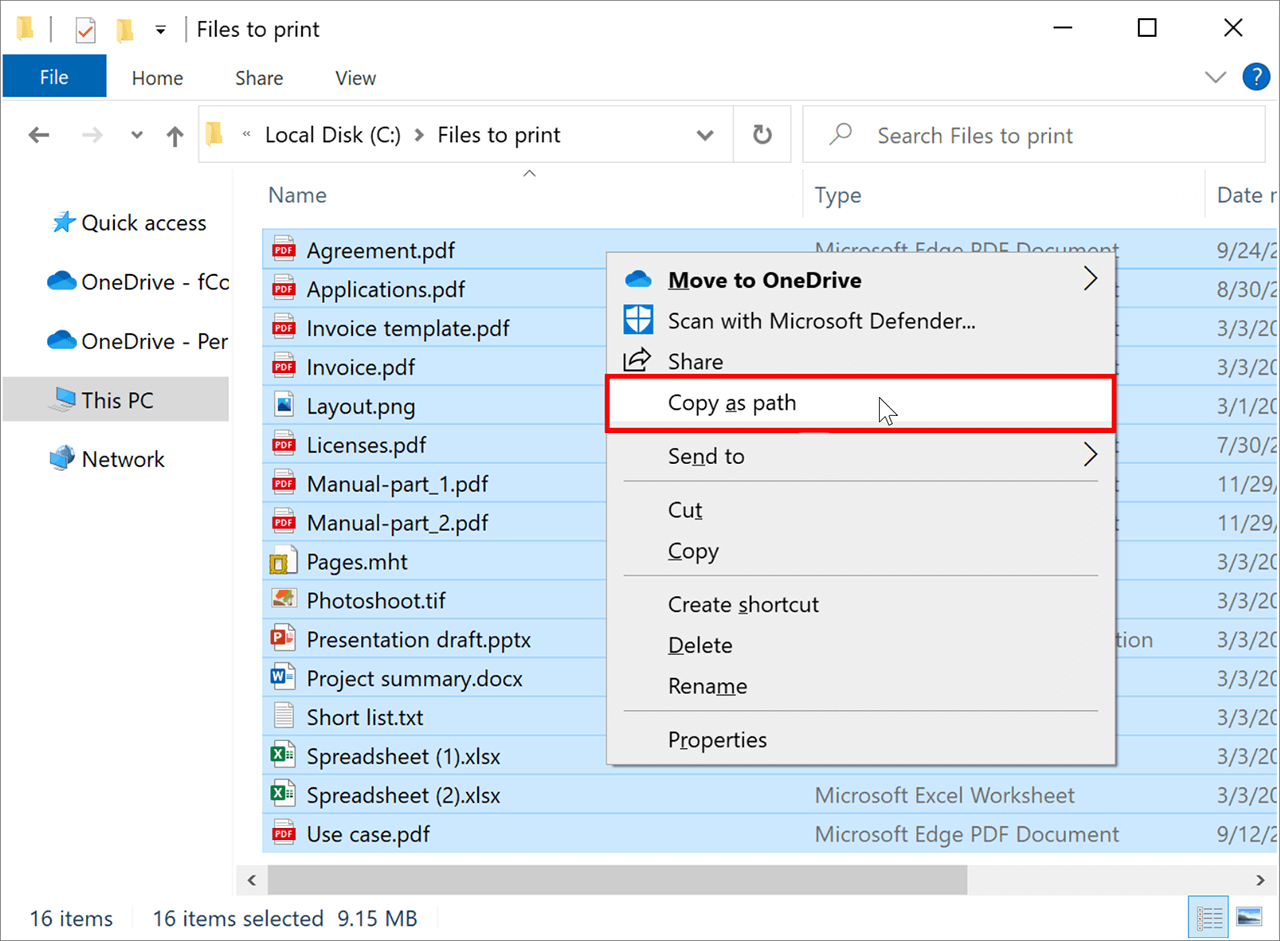
2. Copy file destinations to clipboard
Select all or several files in the folder. While holding Shift, click the right mouse button (RMB). In the context menu choose Copy as path:
3. Create a plain TXT file
Then create a new text document and name it. For example, navigate to folder C:\List and create a new plain text file “docs.txt”.
Open it and paste clipboard data via Ctrl+V or Right-click → Paste.
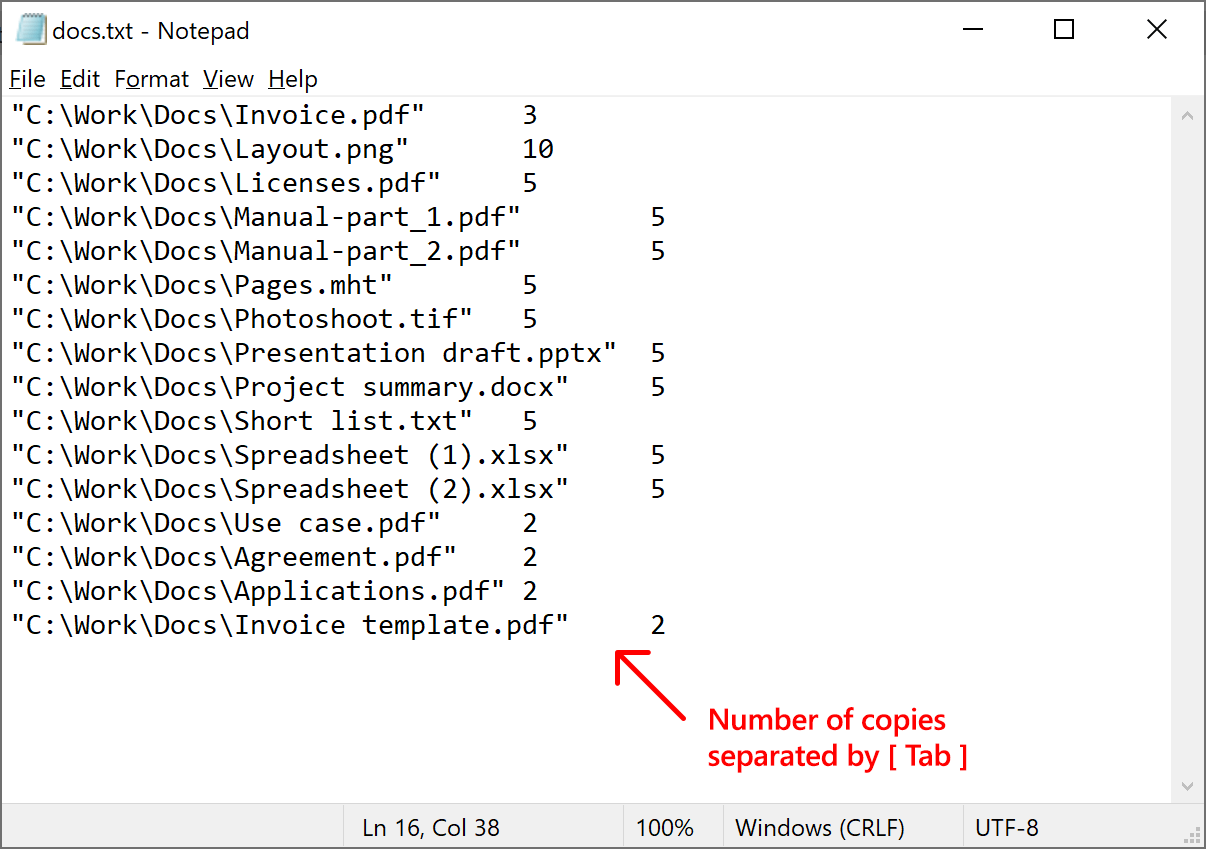
As a result, you'll get a document with file destinations:
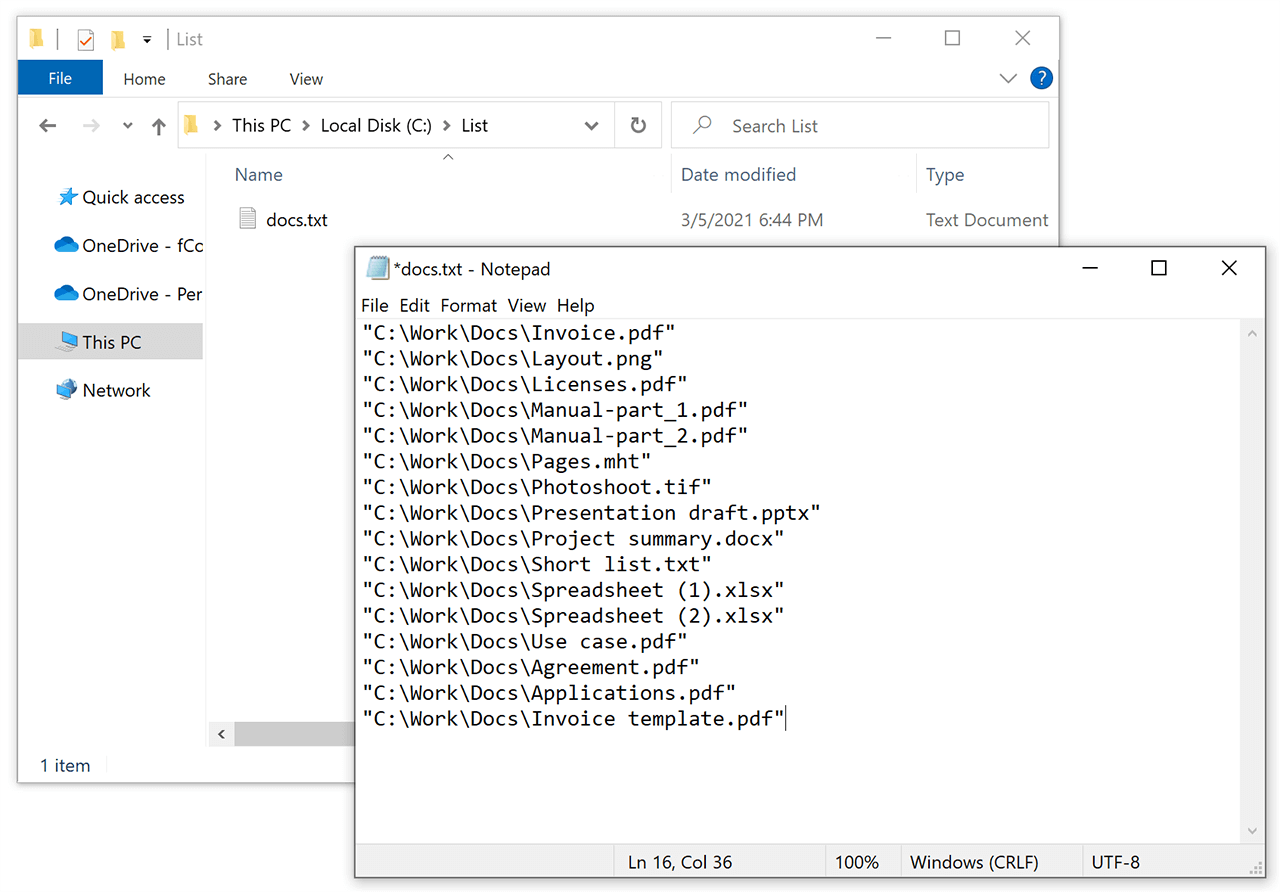
 How to set the number of copies
You can also specify the number of copies for each listed file. To do it, add it next to each file path, after a Tab:
 Having difficulty getting file paths of multiple files and saving them as a list? See our video tutorial.
4. Save it on your computer
The "docs.txt" with a list of paths on the screenshot above should be saved as a Unicode (UTF-8) or ANSI plain text file. Each file path should start from a new line.
5. Run 2Printer command with list
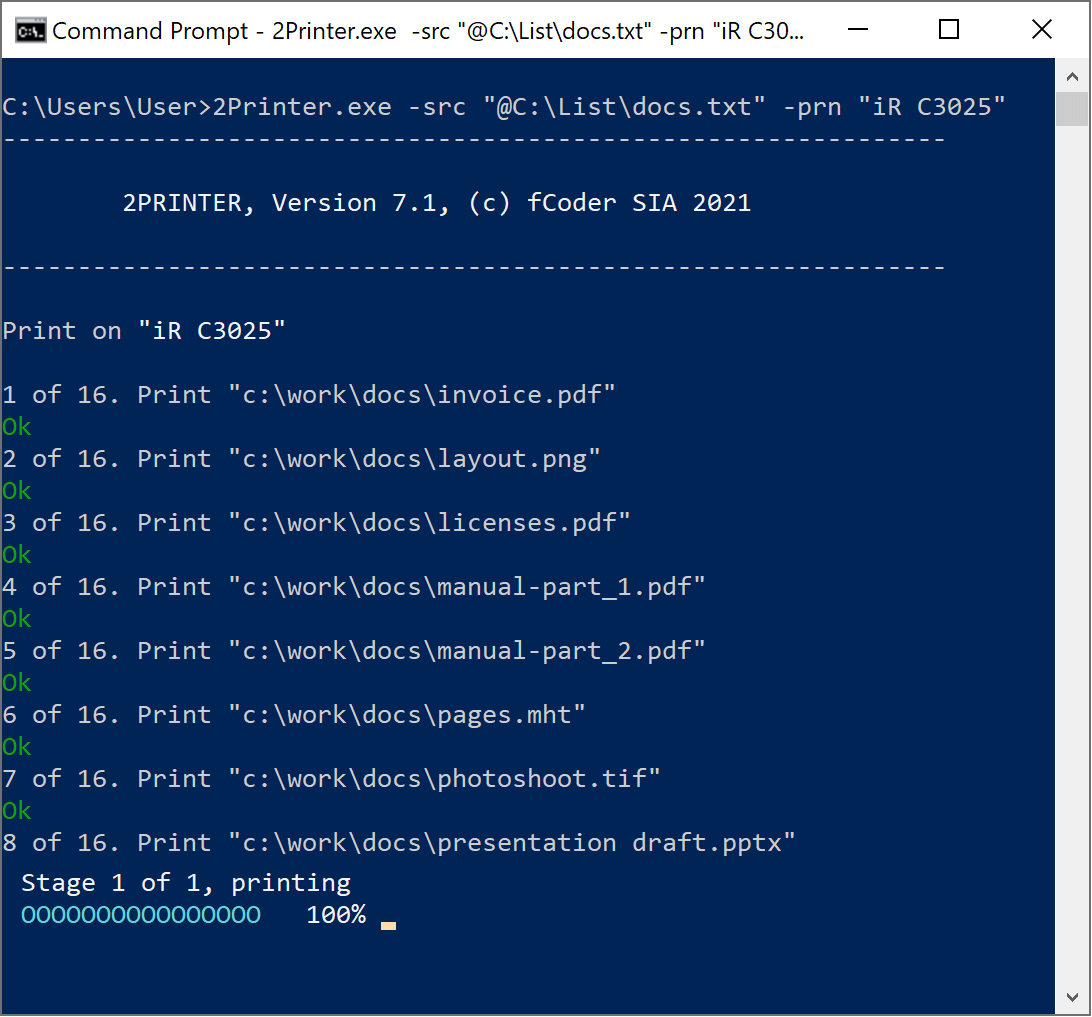
Finally, execute a command with your newly created TXT file as a source (-src). Don't forget to use the @ symbol at the beginning of the path, for example:
If you did everything correctly, you will see 2Printer printing:
Tips and tricks
 A list of documents may be not only plain text (TXT). Comma-Separated Values files (CSV) can be used as well. Your .csv list should be saved with Unicode (UTF-8) encoding. This way, you can use file lists created in Excel.
With 2Printer, you can batch convert files to images. You can do it using 2Printer with virtual printers like Universal Document Converter or Microsoft Print to PDF.
Within one command, you can set many sources for files (-src) to print files from at the same time! For example: -src "C:\In\*.*" "C:\Docs\*.pdf" "@C:\Lists\list.txt".
Consider printing with single print job mode on. Once enabled, there's zero chance that someone else's files will get in the middle of your print job. Besides, you won't get printouts in random order – the files will go to the printer in 100% correct order, as in the list.
If printing docs from a list in the command-line interface is too complicated for you, you can do the same with another solution of ours – Print Conductor. This software has a user interface (GUI with menus and buttons). Or, you may always contact us – we will help you.

Need support or advice from our developers? Please leave us a message, and we will get back to you shortly.