2Printer Settings

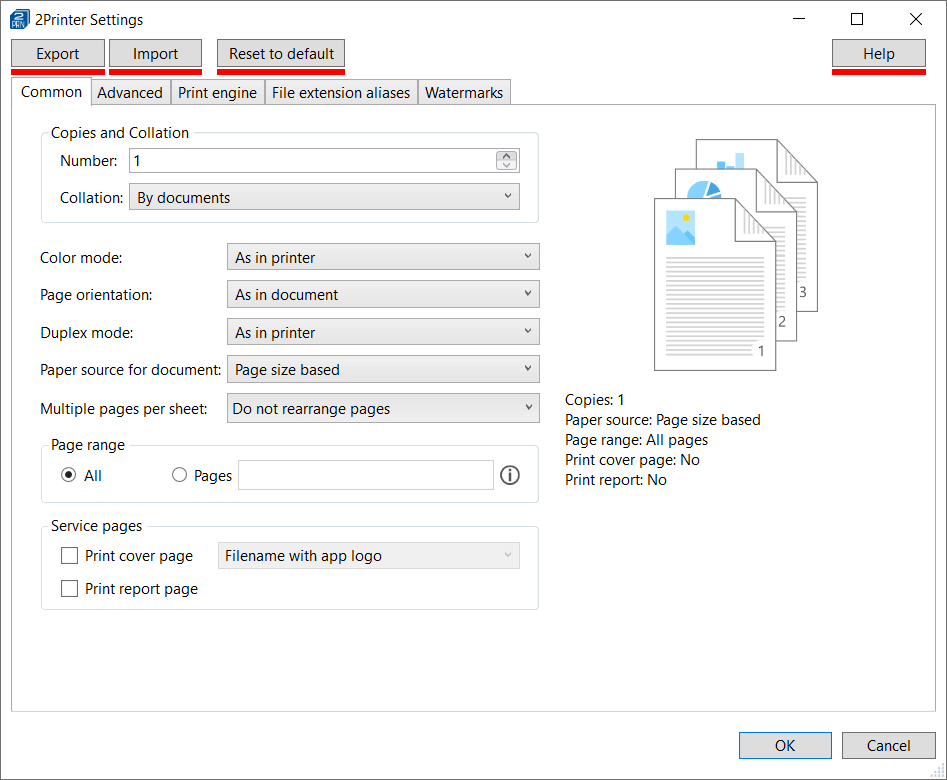
2Printer Settings are the default settings of the program. That means, these settings apply to all tasks performed by 2Printer by default so you don't have to modify them each time when the 2Printer command is executed.

Please note that parameters and values specified using the command line Syntax will override the 2Printer Settings. For example, if you enter -options pages:"1,3,5-7" in the command line and select another page range in 2Printer Settings panel, the latter will not take effect.

This settings panel was designed similar to Print Conductor Settings (batch printing software with GUI) and retains the same functionality.

Contents

How to change 2Printer Settings

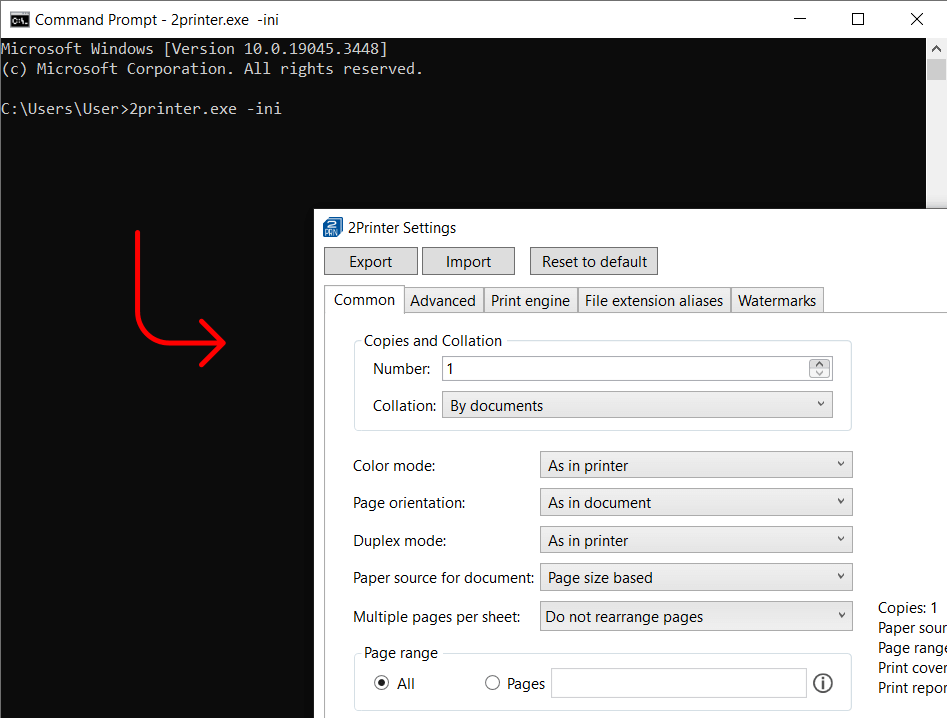
To change default settings of 2Printer, open a command-line interpreter, and execute this command:

2Printer.exe -ini

Control panel with advanced print settings – 2Printer Settings

If you don't change 2Printer Settings, the printing will be performed according to your printer's settings. To check them, go to Control Panel\All Control Panel Items\Devices and Printers, then right-click a device and select Printing preferences.
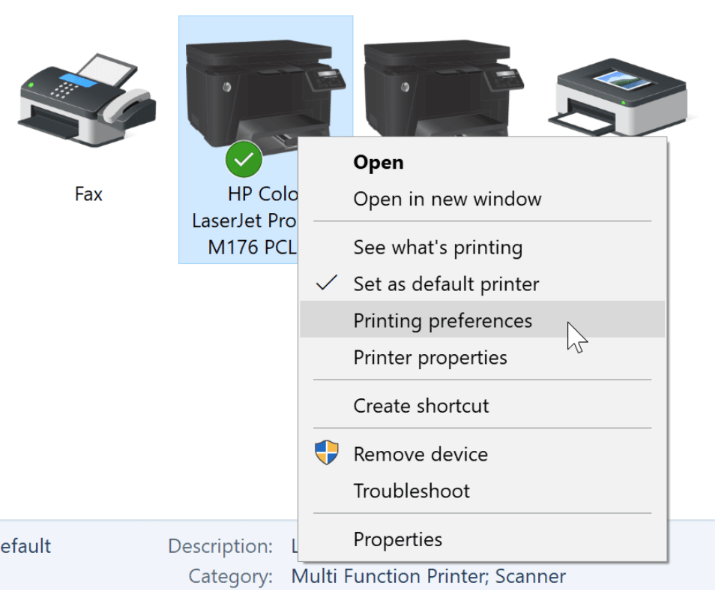
Changing printing preferences in Windows

Common settings

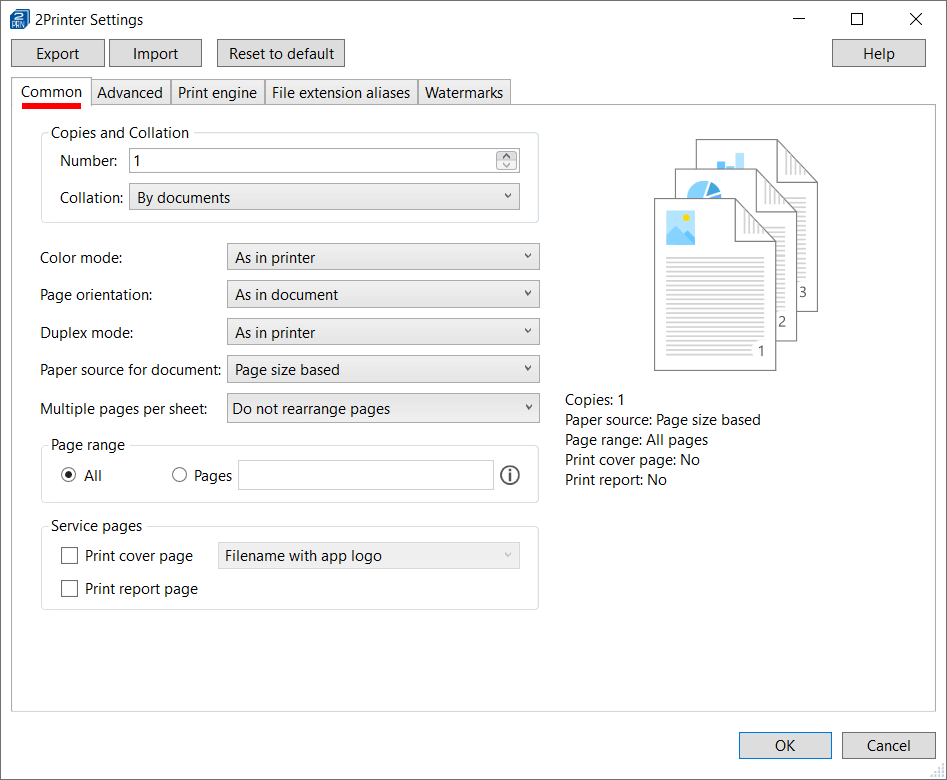
Common printing settings of 2Printer

Paper source for document

Default: Page size based

You can set Paper source for document to:

Page size based The paper source is controlled by 2Printer. It is set by 2Printer automatically depending on the paper size of documents. As a result, each file will be printed from a printer tray, which fits best, depending on the file's paper size.
As in printer The paper source is the same as in your printer's settings. To check them, go to Control Panel\All Control Panel Items\Devices and Printers, then right-click a device and select Printing preferences.

Page range

Default: All

Select pages that should be printed. You can enter page numbers and/or page ranges separated by commas. Here you can set:

  • Single pages. For example: 1,3,5
  • Page ranges separated by commas. For example: 1-5,20-25
  • Complex page range. For example: 1,5-10,12-last

To indicate pages from the end of a document, use the syntax last:

  • last – the last page
  • last1 – page before the last one (the second page from the end)
  • last2 – third page from the end, etc.

Copies

Default: By documents

Configure how many copies should be printed and how they should be sorted (collated).

Collation is a handy feature if you print multiple copies of several documents and want to sort them in advance. You can set it to:

By documents Printouts are collated document-by-document: all copies (copies #1,2,3…) of Document 1, then all copies of Document 2 (copies #1,2,3…).
By pages Printouts are collated page-by-page: pages #1,1,1, pages #2,2,2, etc. of all copies of Document 1; then pages #1,1,1, pages #2,2,2, etc. of all copies of Document 2, and so on.

Service pages

Default: disabled

You can enable printing of additional pages: cover pages or report pages. With the cover page, you can easily distinguish between printed hard copies. Service pages will provide you with useful information about a completed print session. 

Additional service pages in 2Printer

Print cover page

Blank A blank page between printed documents (including all copies). A great way to save paper!
Cover - filename, folder name Document slip sheet with filename and folder name
Filename with app logo [Filename].[file extension] in the center of a page with 2Printer logo 
Filename without extension [Filename] in the center of a page with 2Printer logo, without file extension
Filename without logo  [Filename].[file extension] in the center of a page, without 2Printer logo 
-Browse for file- Custom cover page using a selected file (e.g., PDF, HTML, or any other supported format)

Print report page

Print report page in 2Printer

Print a report page setting enables adding a special report page at the end of each print session. It shows the total number of documents printed since the installation of the program and which ones were printed in the current session.

Advanced settings

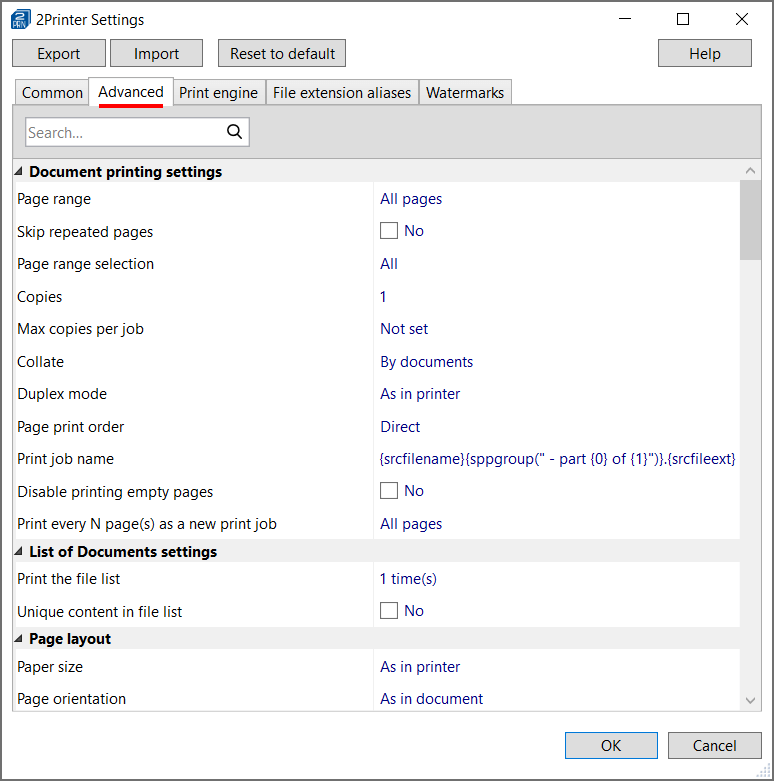
Advanced printing settings of 2Printer

Document printing settings

Controls with parameters that apply to documents. 

Page range

Default: All pages

Type page numbers and/or page ranges separated by commas counting from the start of a document. To set page range including last pages, use the syntax last (last1 for penultimate page, etc.). For example: 1,2,3-5,10-last2,last1,last

Skip repeated pages

Default: No

Avoid printing duplicate pages if overlapping page ranges were specified, e.g., 1-5,4.

Page range selection

Default: All 

Select only Odd or Even pages.

Copies

Default: 1

Select how many document copies should be printed.

Max copies per job

Default: Not set

Sometimes the print job's size and the size of the spool file can get very large, which can slow down printing. With this setting enabled, you can split large print jobs containing docs with multiple copies into smaller parts. It may help reduce the spool file size and make printing faster, especially if the spool file grows very large.

Collate

Default: By documents

Set page collation to By documents or By pages.

Duplex mode

Default: As in printer

Set duplex (double-sided printing) or simplex mode (one-sided printing).

One-sided (Simplex) Printing on one side of paper. 
Long-edge binding Double-sided printing using a vertical page turn in portrait, and horizontal page turn in landscape orientation.
Short-edge binding Double-sided printing using a horizontal page turn in portrait; and vertical page turn in landscape orientation.
As in printer Printing mode is the same as in your printer's settings (Printing preferences).

Page print order

Default: Direct

Set the order of printing pages in a multipage document to Direct or Reverse.

Default: {srcfilename}.{srcfileext}

Set a name for the print job to help you see what's being printed on the printer display. By default, it is set to source file name – dot – source file extension.

Disable printing empty pages

Default: No

2Printer can detect blank pages so you can prevent printing them automatically.

List of Documents settings

Controls with parameters that apply to lists of files. 

Default: 1 time

Specify how many times the entire list of documents should be printed. This feature works if you specify a list with file paths as a source (-src).

Unique content in file list

Default: disabled

Enable or disable adding the same document to the list and printing it several times. This feature works if you specify a list with file paths as a source (-src).

Page layout

Controls with parameters that apply to pages. 

Paper size

Default: As in printer

Select paper size (page format), e.g., A4 or Legal.

As in printer The paper size is controlled by your printer's settings. To check them, go to Control Panel\All Control Panel Items\Devices and Printers, then right-click a device and select Printing preferences.
Page size based The paper size is controlled by 2Printer. It is set by 2Printer automatically depending on the paper size of pages. As a result, each page will be printed with width and height dimensions, which fit best.

Page orientation

Default: As in document

Set the orientation of pages to portrait or landscape (horizontal or vertical layout).

Portrait Set vertical orientation.
Landscape Set horizontal orientation.
As in document Keep the orientation of the original document pages.
As in printer Keep page orientation as in your printer's settings (Printing preferences).

Auto rotate

Default: Clockwise

2Printer auto rotates pages automatically so that they fit a sheet of paper. The program automatically detects the best page orientation for each document and rotates it to landscape or portrait. Choose which way the pages should be turned – Clockwise or Counterclockwise – or disable auto rotation by selecting None.

Color mode

Default: As in printer

Set color mode to: 

  • Grayscale – grayscale mode, print using various shades of grey 
  • Color – color mode, print in color mode
  • As in printer – as in your printer's settings (Printing preferences

Don't change the default setting if you want to keep some special color properties defined in your printer's settings.

Color mode for selected pages

Default: None

Select different color modes (Color/Grayscale/As in printer) for different pages or page ranges.

Printer resolution

Default: As in printer

You can get a quick version (draft) of your documents or a slower, but high-quality output. Change printer resolution to: 

  • As in printer – as in your printer's settings (Printing preferences
  • High – print at a high-quality level
  • Medium – print at a standard quality level
  • Low – print at a low-quality level
  • Draft – print low-quality draft output

Most printers support this feature. 

Scale mode

Default: Shrink

Scale mode defines page sizing and scaling: how large or small the printouts should be. You can change it to: 

Shrink Shrink-to-page option: decreases page size to printable area. It resizes only large pages to fit the paper and prints small pages in the original size.
Fit Fit-to-page option: fits page size to printable area. Scales small pages up and shrinks large pages down to fit the paper.
As is "As is" option: prints pages or images in their original size.
Fill Fill-to-page option: print a full page from edge to edge on the short side. No matter the size, the page will fill the whole sheet of paper or even beyond the paper (on the long side).
Zoom level Set a specific scaling (e.g., 50% or 110%) in relation to the printable area. 

Default: disabled

Convert documents into a raster graphic (bitmap) image before printing. This feature may be handy if you have some print quality issues (e.g., characters look incorrect, or the overall quality looks poor).

Rasterization resolution

Default: 300 DPI

Set rasterization resolution value (DPI, Dots Per Inch) which affects quality of files when they are rasterized before printing. This setting applies only when printing in Print as image mode. Resolution can be set in a range between 72 to 2048.

Default: disabled

Add crop marks (cut marks, trim marks) that are thin lines printed in the corners of your document sheets of paper to show where to trim the paper.

Vectorize text

Default: No

Turn text characters into outlines (curves) before printing. When printing, this will create a document with vectorized characters, and the text will be non-searchable.

Horizontal alignment

Default: Center

Align page or image to a side of a sheet of paper horizontally. Possible values:

  • Left
  • Center
  • Right

Vertical alignment

Default: Center

Align page or image to a side of a sheet of paper vertically. Possible values:

  • Top
  • Center
  • Bottom

Horizontal offset

Default: 0

Shift the page or image's position horizontally (X-axis) using a custom value, which equals 0.01 inch. Zero (0) is the starting point located in the top left corner of a page or image. You can enter any positive or negative value. 

Vertical offset

Default: 0

Shift the page or image's position horizontally (Y-axis) using a custom value, which equals 0.01 inch. Zero (0) is the starting point located in the top left corner of a page or image. You can enter any positive or negative value.

Single print job mode

Controls with parameters that apply to 2Printer's single print job mode. 

Enabled

Default: disabled

Enable single print job mode if you want your files to be printed as a solid batch, in a strictly defined order. This mode ensures that:

  • the file order is 100% correct, and the Windows print spooler doesn't mix them;
  • print jobs coming to the same printer from different users are not mixed up.

Default: enabled

When printing in the single print job and duplex mode at the same time, an extra blank even page is added in the middle (for documents with an odd number of pages) by default. This way, every new document (or next copy) will start from a new paper sheet. If you want to print the whole set of documents without these blank pages in the middle, uncheck the Print extra blank even page in duplex mode option.

Single print job name

Default: 2Printer's solid print job

Enter a specific name for single print job file(s). The name appears in the print queue (spooler) on the computer and the printer display – one name for the entire set of documents. This way, you can quickly identify which job is currently being printed or is having issues.

Attachments

Controls with parameters related to file attachments handling. 

Default: After main document

Set the method of processing attachments. If you print files that have attachments, such as emails or PDF Portfolio documents, you can select what 2Printer should do with them: 

  • Ignore – ignore attachments
  • After main document – print attachment after a document
  • Before main document – print attachment before a document
  • Print only attachments – print attachments only

In the same print job with document

Default: No

Printing an email plus its attachments in the same print job ensures they are printed one after another. It can be handy, for example, if you want to staple the attachment and the document together after printing.

Sort attachments

Default: Name

Sort attachments alphabetically or using other parameters: by type, size, date, etc. It can be applied, for example, to Outlook MSG or EML files, and PDF Portfolio files.
Select how file attachments should be sorted:

  • Name
  • Type
  • Size
  • Date
  • Unsorted
  • Name descending
  • Type descending
  • Size descending
  • Date descending

Ignore attachments of unknown type

Default: Yes

By default, 2Printer ignores attachments that have any other format that is not supported by the program. This helps avoid errors when, for example, processing PDFs with XML attachments that do not need printing. So when this setting is on, 2Printer will not process attachment(s) if it can't recognize their format.

Include attachments by file mask

Default: *.*

Use expression that allows printing certain attachments by mask. For example, use *.pdf to print PDF attachments only; enter attachment.* to print only files containing "attachment" in the filename. 

Exclude attachments by file mask

Default: none

Use an expression that restricts printing of certain attachments by mask. For example: *.docx

Paper sources

Controls with parameters related to printer tray selection. 

Paper source for documents

Default: Page size based

Select the input tray for paper, for documents.

Possible options:

As in printer The paper source is the same as in your printer's settings (Printing preferences)
Page size based The paper source is selected automatically by 2Printer to fit the page size of documents the best way.

Paper source for selected pages

Default: List is empty

Paper source for selected pages

Select input tray(s) for paper, for a specific page range. It has the same options as Paper source for documents plus The same as for document.

Paper source for cover pages

Default: The same as for document

Select the paper source for cover pages. It has the same options as Paper source for documents plus The same as for document.

Paper source for folder cover pages

Default: The same as for document

Select the paper source for folder cover pages. It has the same options as Paper source for documents plus The same as for document.

Paper source for report page

Default: The same as for document

Select the paper source for report pages. It has the same options as Paper source for documents plus The same as for document.

Service pages

Default: No

Enable printing an additional cover page to distinguish between printed documents (or copies). The cover page is a sheet of paper that separates each newly printed document from the previous one. You can select a cover page template that you prefer. 

In the same print job with document

Default: No

Print a document and a cover page in the same print job. This ensures they are printed one after another. It can be handy, for example, if you want to staple the cover page and the document together after printing.

Cover page mode

Default: One cover page for all copies

Insert cover pages either between each document plus all its copies (One cover page for all copies) or between each copy (Cover page for each copy).

Cover page template

Default: Filename with app logo

Set a cover page template with various page layouts, select your file to be used as a cover page, or create your own using the Cover page Designer.

Default: No

Enable printing an ending cover page between each document/copy. An ending cover page is the same as a regular cover page, but is added to the end of a document.

Ending cover page template

Default: Filename with app logo

Set a cover page template with various page layouts, select your file to be used as a cover page, or create your own using the Cover page Designer.

Default: disabled

Enable printing an additional folder cover page – a cover page separating printed files located in different folders. With this setting enabled, 2Printer adds an extra cover page for each group of documents coming from a specific folder. Thus, you can easily distinguish files coming from different folders.

Folder cover page template

Default: Cover - filename, folder name

Set a cover page template with various page layouts, select your file to be used as a cover page, or create your own using the Cover page Designer.

Default: No (always enabled in trial version)

Enable printing an additional report page. The report page shows the total number of documents printed via 2Printer since the installation of the program. It also contains a list of all types of documents printed in the current session and their number.

Default: No

Print service pages (cover and/or report pages) only, without the documents.

Service pages paper size

Default: Default

Service pages paper size

Select a paper size or set a custom size for service pages. You can select:

  • Default – use the standard local paper size based on your printer or computer's system locale; e.g., A4 in Europe and Letter in the U.S.;
  • Standard – select a pre-defined format;
  • Custom (set any width x height in millimeters, centimeters, or inches.

Please note that this setting applies to both report pages and cover pages.

File loading settings

CAD

Controls with parameters related to printing DWG, DXF, DFT, SLDDRW, and other CAD drawings. 

Worksheet name

Default: *all*

Define which worksheets should be printed. You can set it to:

*all* Print all worksheets contained in a file
*default* Print default (active) worksheet only
My worksheet 1 Print a specific sheet (by worksheet name, e.g., "My worksheet 1")

Split worksheets

Default: disabled

Split multi-sheet spreadsheets when printing. When it's on, 2Printer splits the document when sending it to printer – each worksheet as a separate item in the print queue (spooler).

Skip model view

Default: disabled

Skip model view of a CAD drawing. 

Default line weight

Default: -1

Change how the lines should look on a printed CAD drawing. You can make them thinner or thicker. 

Paper size limit

Default: A3

Set the maximum page size (paper format) for printing CAD drawings. You can select a Standard or Custom page size in millimeters, centimeters, or inches.

Try to use SHX fonts

Default: enabled

Use SHX fonts (if they are contained within your drawings). By default, 2Printer tries to use them.

Grayscale

Default: enabled

Set grayscale mode.

SHX font folders

Default: enabled

Browse for folder(s) where SHX fonts are located so that 2Printer could use them.

Page margins

Default: 0, 0, 0, 0

Margins for CAD worksheets

Specify custom page margins for CAD drawings, in points: left, right, top, and bottom margin. 

E-mail message format

Controls with parameters related to the processing of EML, MSG, OST, PST, P7M, and other email files. 

Page size

Default: Default

Select a page size for email files. You can select:

  • Default – use the standard local paper size based on your printer or computer's system locale; e.g., A4 in Europe and Letter in the U.S.;
  • Standard – select a pre-defined format;
  • Custom (set any width x height in millimeters, centimeters, or inches.

Excel

Controls with parameters related to printing Excel spreadsheets. 

Split worksheets

Default: disabled

Split multi-sheet spreadsheets when printing. When it's on, 2Printer splits the document when sending it to a printer – each worksheet as a separate item in the print queue (spooler).

Hide main window

Default: enabled

Hide the main window of Excel (or Excel alternative) during batch printing via 2Printer. 

Scale mode

Default: As is

Scale mode defines page sizing and scaling for Excel files. You can change it to: 

Shrink Shrink-to-page option: decreases page size to printable area. It resizes only large pages to fit the paper and prints small pages in the original size.
Fit Fit-to-page option: fits page size to printable area. Scales small pages up and shrinks large pages down to fit the paper.
As is "As is" option: prints pages or images in their original size.
Fill Fill-to-page option: print a full page from edge to edge on the short side. No matter the size, the page will fill the whole sheet of paper or even beyond the paper (on the long side).
Zoom level Set a specific scaling (e.g., 50% or 110%) in relation to the printable area. 

Worksheet names

Default: *all*

Define which worksheets should be printed. You can set it to:

*all* Print all worksheets contained in a file
*default* Print default (active) worksheet only
My worksheet 1 Print a specific sheet (by worksheet name, e.g., "My worksheet 1")

Print headings

Default: disabled

Enable or disable printing headings (row 1, 2, 3… and column numbers A, B, C…) to the output printed pages.

Print comments

Default: Print at the end of sheet

Define how comments in Excel files should be processed: Print at the end of sheet, Print as displayed on sheet, Print without comments

HTML

Controls with parameters related to the processing of HTML files. 

Page size

Default: Default

Select a page size for HTML files. You can select:

  • Default – use the standard local paper size based on your printer or computer's system locale; e.g., A4 in Europe and Letter in the U.S.;
  • Standard – select a pre-defined format;
  • Custom – set any width x height in millimeters, centimeters, or inches.

Page margins

Default: 0, 0, 0, 0

Specify custom page margins for HTML files, in points. 

Zoom level

Default: Shrink to fit

Scale up or down the size of HTML pages, in percents. 

Auto fit X

Default: None

Automatically fit HTML pages to page size horizontally (X-axis).

Auto fit Y

Default: 0

Automatically fit HTML pages to page size vertically (Y-axis).

PDF

Controls with parameters related to batch printing of PDF documents. 

Draw annotations

Default: enabled

Enable printing annotations and pop-up comments in PDF files. By default, they are printed. 

Overprint

Default: disabled

Enable overprinting for PDF with graphics. This setting simulates the blending and overprinting of colors in PDF documents.

Portfolio files pre-sorting

Default: Unsorted

Enable sorting By index for PDF Portfolio attachments.

Text

Controls with parameters related to printing plain text files.

Code page

Default: Default

Select character encoding for plain text files, e.g., Unicode or ASCII.  

Font

Default: "Consolas" 11

Font style and size

Set font style and size. 

Line spacing

Default: 0.15

Define a custom spacing between lines of text, in points. 

Paper size

Default: A4

Select paper size (page format), e.g., A4 or Legal.

  • Standard – select a pre-defined format;
  • Custom – set any width x height in millimeters, centimeters, or inches.

Page margins

Default: 10, 8, 10, 8

Specify custom page margins for text files, in points: left, right, top, and bottom margin. 

Word

Controls with parameters related to printing DOCX, DOC, and other Word documents.

Update fields

Default: disabled

Automatically update dynamic fields in Microsoft Word files (e.g. [Date], [Time], [Name]). As a result, the up-to-date values of Microsoft Word's built-in dynamic fields will be displayed in the output documents after printing.

Hide revisions

Default: disabled

Do not show all the revisions that were made to a document while the Track Changes option was turned on. The changes remain part of a Word document until they are accepted or rejected.

Skip comments

Default: disabled

Print Word documents without comments if they were made inside a document.

Markup mode

Default: As is

Select Markup mode and which revisions should be kept:

  • Balloon revisions
  • Inline revisions
  • Mixed revisions
  • As is

Keep bookmarks

Default: In-text bookmarks

Select bookmarks which should be displayed on a printed document:

  • Without bookmarks
  • Heading bookmarks
  • In-text bookmarks

ZPL

Controls with parameters related to printing Zebra ZPL files (barcodes, labels). 

Dpmm

Default: 8

Set print density for ZPL files. We recommend choosing one of the following values:

  • 6 dpmm (152 DPI);
  • 8 dpmm (203 DPI);
  • 12 dpmm (300 DPI);
  • 24 dpmm (600 DPI).

Width

Default: 4

Set width for ZPL files, in inches. 

Height

Default: 6

Set height for ZPL files, in inches. 

Proxy host

Default: none

Configure ZPL proxy host settings. You can change it to the needed value.

Proxy port

Default: 0

Configure ZPL proxy port settings. You can change it to the needed value.

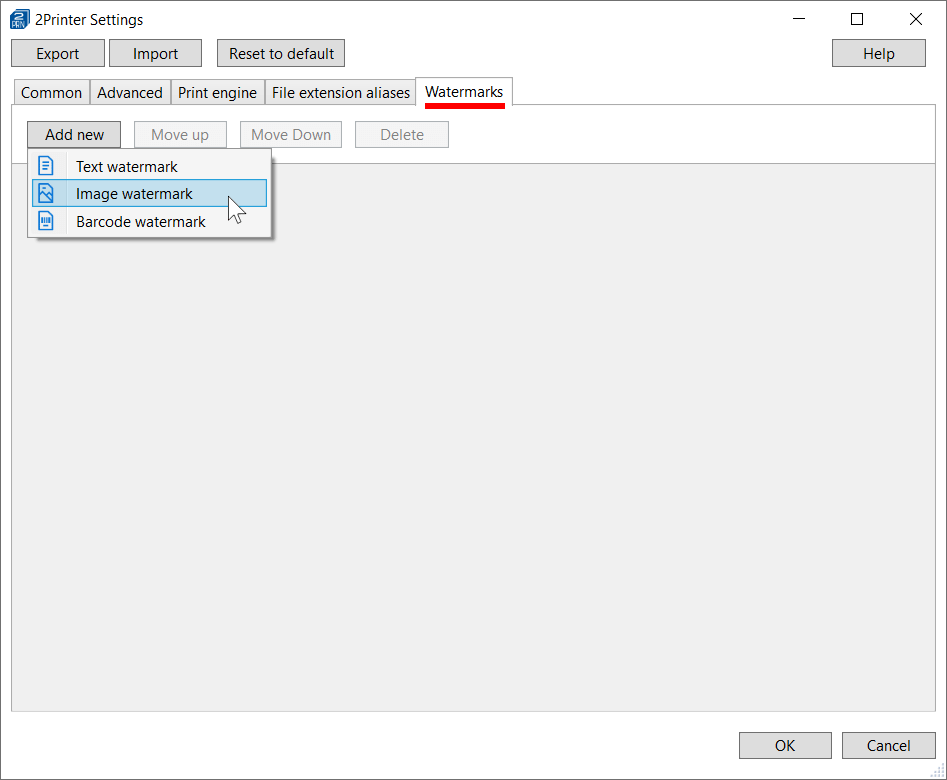
Text watermark

Controls with parameters related to adding a text watermark onto pages.

Text watermark enabled

Default: disabled

Enable text watermark. When it's on, the text watermark ({srcfilepageno}) adds page numbers onto pages in the bottom right corner of pages. You can modify the watermark using Text watermark settings.

Text watermark settings

Default: {srcfilepageno}

2Printer text watermark settings

Configure a text watermark. You can:

  • add custom text – you can enter any text and customize the text watermark, including font style, size, and background color
  • add page numbers – use the default macro {srcfilepageno} 
  • add other source file data such as filename, folder name, date/time, pages, and more
  • change watermark font style, alignment, margins, rotation, background color, and more

To add source file data, you can use and combine various macros. Click the Macro button to select a macro to be used.

Macro name Macro Description
File folder {srcfilefolder} Folder path where the file is located.
File folder name {srcfilefoldername} Folder path where the file is located.
Filename {srcfilename} File name (without extension).
File extension {srcfileext} File extension, e.g., pdf.
File type {srcfiletype} File type.For example: Microsoft Office Word
File date {srcfiledate} Date of file processing by 2Printer
File time {srcfiletime} Time of file processing by 2Printer
File pages {srcfilepages} The total number of pages
File page number {srcfilepageno} The number of a page that is being printed
File author {author} Name of the user who created the file
File creator {creator} Software with which the file was created
File custom text {customtext} Custom text entered by the user. For example, you can add a column #customtext in an Excel file and enter your own text to sort files in the spreadsheet
Container name {containername} Name of an email message file, an archive (RAR, ZIP, 7ZIP), or a PDF Portfolio file.
Copies {copies} File's total number of copies
Copy {copy} Current copy number. Please note that this macro works properly only when Single print job mode is on (spjob:yes)
Date {date} Insert date (DD.MM.YYYY)
Time {time} Insert time (HH:MM:SS)
Item # in list {listitemno} Item's index number (#) in the list of files

Multiple pages per sheet

Controls with parameters related to printing several pages of a multipage document onto a single sheet of paper.

Enabled

Default: disabled

Enable 2Printer's multiple-pages-per-sheet mode.

Horizontal pages on the sheet

Default: 1

Set the number of pages placed horizontally.

Vertical pages on the sheet

Default: 1

Set the number of pages placed vertically.

Horizontal space

Default: 0.5% of the long side (width/height)

Set space gaps between pages placed horizontally.

Vertical space

Default: 0.5% of the long side (width/height)

Set space gaps between pages placed vertically.

Draw rectangular frame

Default: enabled

Draw frame around each page

Add a border around every page when multiple-pages-per-sheet mode in on. You can change the frame color manually or enter RGB values or an HTML code to be used.

Text watermark enabled

Default: disabled

Enable text watermark in multiple-pages-per-sheet mode.

Text watermark settings

Default: {srcfilepageno}

Configure the text watermark in multiple-pages-per-sheet-mode. They have the same settings as a "regular" Text watermark.

Files and folders

Controls with parameters related to files and folders.

Recurse subfolders

Default: disabled

Recurse subfolders

Allow including files from subdirectories and print them too (subfolder recursion). You can uncheck the box next to Include files in subfolders to disable this feature or enter paths to folders that should be ignored (each path on a separate line).

Exclude files by mask

Default: ~$*.*, *.db, desktop.ini

Enter an expression to restrict printing of certain files by mask. For example, use *.docx to ignore Word files.

Password list

Default: none

Print password-protected documents

Enter the password for the source files, if they are password-protected. If your files are protected with more than one password, you can specify multiple passwords, too (each on a separate line).

Keep source files available for editing

Default: disabled

Allow opening and editing of source files when 2Printer is processing them. 

To open files while they're being printed:

  1. Open 2Printer Settings with this command: 2Printer.exe -ini
  2. Go to the Advanced tab and enable the setting Keep source files available for editing.

Keep source files editable when they are being printed

Temp folder

Default: %TEMP%

Set path to a folder for temporary files. By default, it is C:\Users\[User]\AppData\Local\Temp 

To change the TEMP folder:

Open 2Printer Settings with this command: 2Printer.exe -ini

  1. Go to the Advanced tab and find the Logfile folder setting
  2. Enter a new folder path or click a folder icon to open the Select folder dialog box.

Change log file location

Post processing

Controls with parameters related to post-processing actions to be performed automatically after printing.

Successfully printed files

Default: none

Copy files automatically after printing

Select an action to be performed with successfully printed files: do nothing, copy/move to another folder, or delete.

You can also automatically delete empty subfolders after the printed files are moved or deleted from a subfolder – if they are not needed (Delete empty subfolders). You can also enable this option directly from the command line syntax.

Files that failed to print

Default: none

Select an action to be performed with files that failed to print for some reason: do nothing (none), copy/move to another folder, or delete.

Task processor

Controls with parameters related to the operation of 2Printer.

Timeout

Default: 5 minutes, 100 minutes, 10080 minutes

Set time limit for processing a single file. After this time is over, 2Printer will proceed to another file. Please do not change this parameter unless our support service advises it.

Memory leaks limit

Default: 512 MB

Set limit to random-access memory allocated for 2Printer's work. If the amount of memory leaks exceeds a certain limit, the program engine restarts automatically without interruption. This lets 2Printer process any number of files per session.

Restart after jobs number

Default: 4096 jobs

Automatically restart the program engine after a certain number of print jobs.

Enable custom scripts

Default: Yes

Custom Python scripts may be used that change the program's default behavior. They are enabled by default. Turning them off returns the program to the default state.

Disabled helpers

Default: none

Disable specific components 2Printer that are used by the program to print certain types of files. Please do not change this parameter unless our support service advises it.

Log

Controls with parameters related to logging made by 2Printer. 

Verbosity

Default: Verbose

Select the type of log created by 2Printer. You can select between Verbose, Regular, Laconic, and Trace.

Create new logfile after

Default: File size limit exceeds

Choose when a new log file should be created (and the old log replaced). You can select between File size limit exceeds and Every day.

File size limit

Default: 16 MB

Set limit for the size of a logfile. 

Keep log history

Default: 8 file(s)

Set the number of files that keep the log history.  

Logfile folder

Default: %TEMP%

Set path to a folder for log files. By default, it is C:\Users\[User]\AppData\Local\Temp 

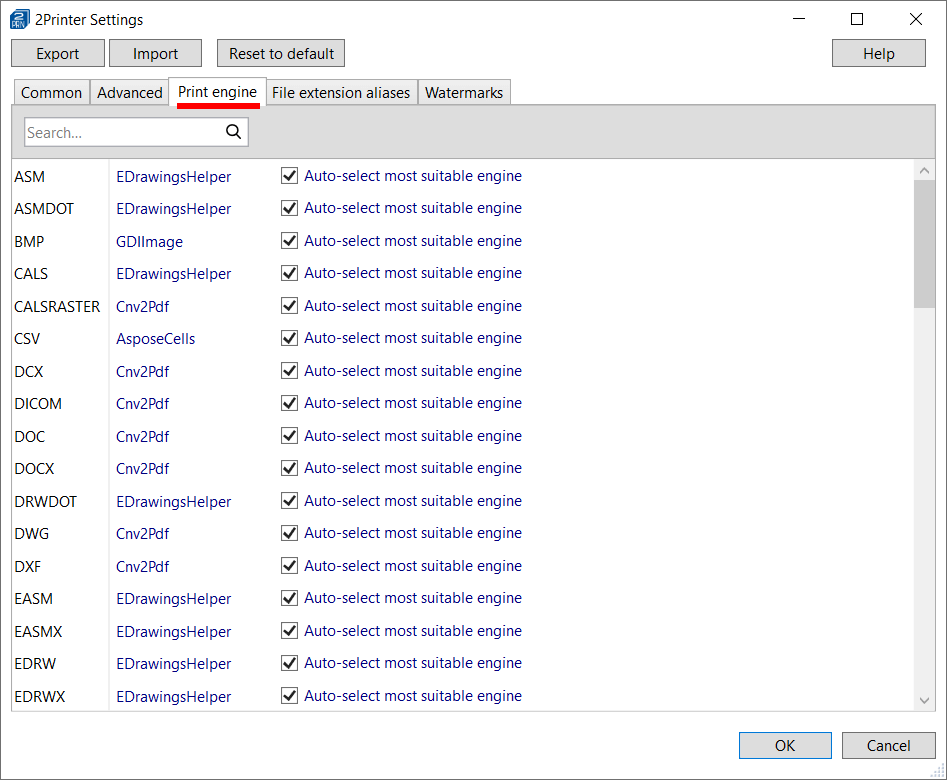
2Printer print engine selection

2Printer can be flexible when it comes to processing different file types. It can switch between different modules if an uncommon file cannot be handled properly. The modules include Cnv2Pdf, CADlib, Patagames, EDrawingsHelper, and some others. Please do not change these settings and contact our specialists if you have any issues with a specific type of file.

File extension aliases

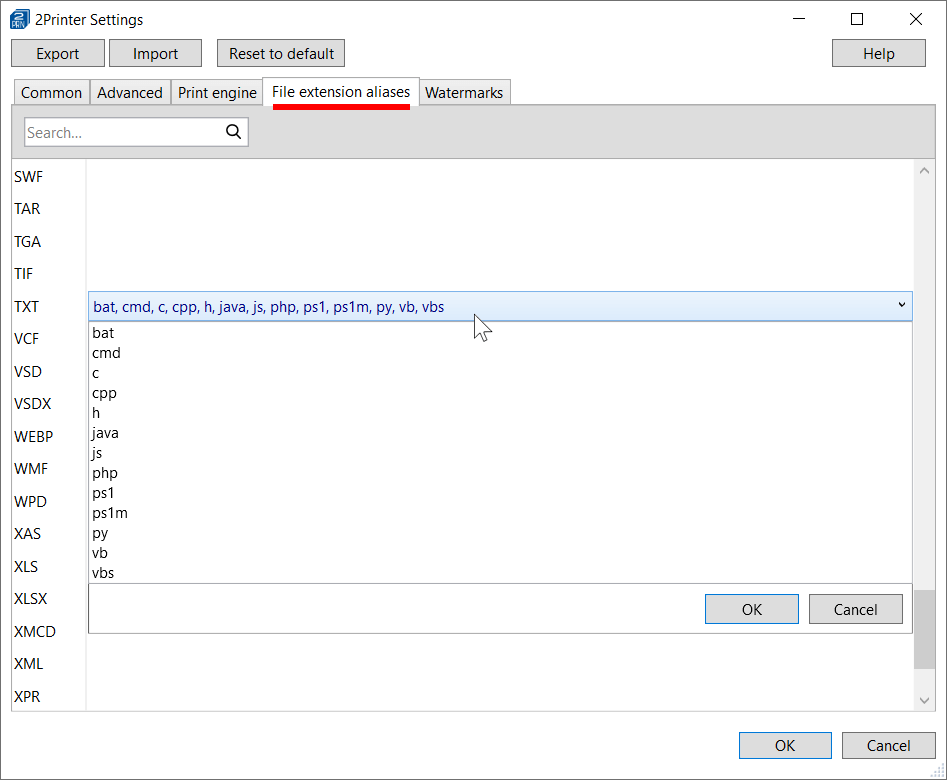
2Printer file extension aliases

If you have files in supported format but with a non-standard file extension, 2Printer won't let you process these files. Still, there is a way to print them.

For example, your software generates [filename].invoice files, which are structurally PDF. 2Printer does not recognize files with ".invoice" extension. However, with the help of the File extension aliases tab, it is possible to import and print them – just associate your .invoice files with PDF format. Then your files will be processed the same way as PDF, which is one of the supported file types.

Associate files without extension

If you have files without any extension, you can associate them with one of 2Printer's formats, for example, TXT.

To set file type associations for files without extension: 

  1. Open 2Printer Settings with this command: 2Printer.exe -ini
  2. Go to the File extension aliases tab.
  3. Add "empty extension" by entering symbols "" at the end of the list.

Set or change file associations in 2Printer